How to set up OneMesh on the TP-Link router?
What is OneMesh?
Not sure if you should replace your current router with a fresh Mesh solution? Your problem is solved by TP-Link OneMesh. Enjoy seamless mesh WiFi by simply connecting a OneMesh range extender or powerline extender to a OneMesh router. * To experience the mesh network, please upgrade the OneMesh devices’ firmware.
- OneMesh is a feature available on some TP-Link routers and extenders that allows you to set up a mesh network. This allows you to expand your existing network and provide high-speed Wi-Fi across your house by using existing compatible devices rather than acquiring a new Mesh system.
- Please see https://www.tp-link.com/us/onemesh/product-list/ for a comprehensive list of TP-Link devices that support OneMesh.
How to set up OneMesh?
- Check to see whether your current TP-Link router supports OneMesh.
- Connect the router to one or more OneMesh-compatible range extenders or powerline adapters.
Make use of your whole-home network. - Please keep in mind that you cannot set up a OneMesh network between two routers.
How to Set Up OneMesh Range Extender Using a Web Browser?
To configure the OneMesh range extender through a web browser, follow the instructions below. RE300 is used as an example here.
- Connect the extender to an electrical outlet near your router and wait for the Power LED to turn solid on.
- Wirelessly connect your PC to the extension as follows:
For Windows Users
- Unplug your computer’s Ethernet cable (if any).
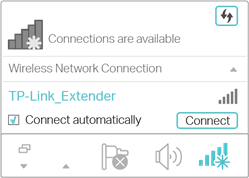
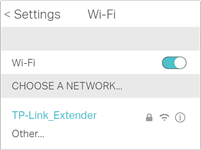
- Click the Wi-Fi icon in the taskbar to connect to the wireless network of the extender: TP-Link Extender.
For Mac OS X Users
- Unplug your computer’s Ethernet cable (if any).
- Click the Wi-Fi icon in the upper right corner of the screen and join the extender’s network: TP-Link Extender.

- Follow the Quick Setup Wizard instructions to connect the extender to your host router that supports the OneMesh capability.
1) Open a web browser and type http://tplinkrepeater.net or http://192.168.0.254 in the address box, followed by a password to log in.
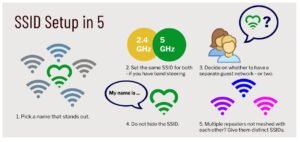
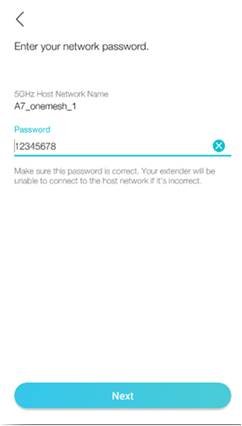
2) Select the 2.4GHz SSID (network name) of your host router that supports OneMesh and is marked as OneMesh, input its password (NOT the password you just created for administration), and click Next.
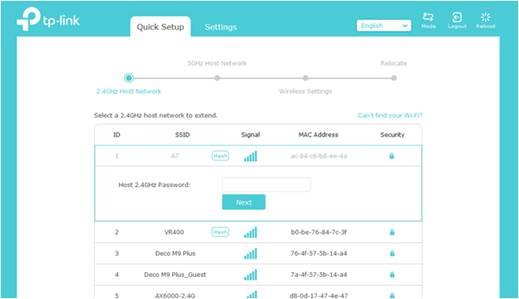
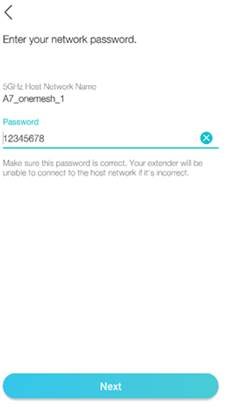
3) Select the 5GHz SSID (network name) of your host router that supports OneMesh and is marked as OneMesh, input its password (NOT the password you just established for administration), and click Next.

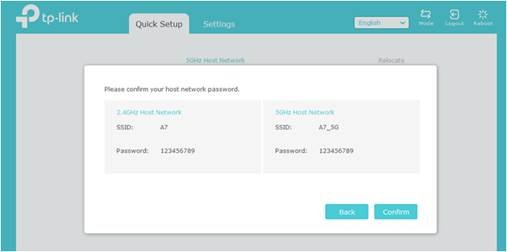
4) Confirm your host network password.
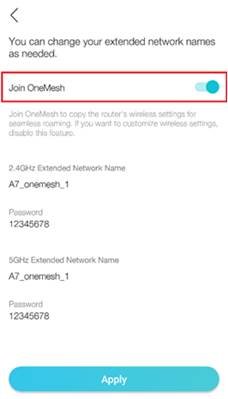
5) When connected to a TP-Link OneMesh router, the extender will join the router’s OneMesh network and duplicate the router’s wireless settings.
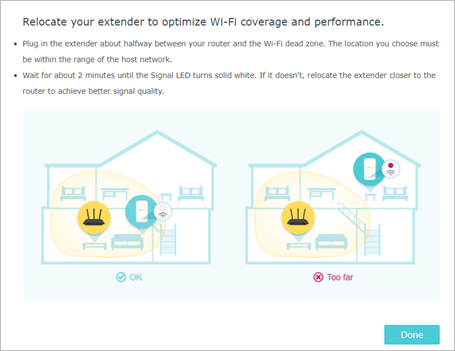
6) Follow the on-screen directions to reposition your extender for the best Wi-Fi coverage and performance, then click Done.
7) At the completion of the setup, a success screen appears, indicating that the extender has successfully joined the router’s OneMesh network and duplicated the router’s wireless settings. Visit https://www.tp-link.com/onemesh/ for more information about OneMesh.

* To experience a smooth connection between dual-band networks, it is advised that you enable Smart Connect on your host router. Your host router’s 2.4GHz and 5GHz networks share the same SSID (network name) and password when Smart Connect is enabled. To activate Smart Connect, see the user handbook for your host router.
How to Configure OneMesh Range Extender via WPS Button?
To set up the OneMesh range extender through the WPS button, follow the instructions below. RE300 is used as an example here.
1. Plug the extension into an electrical outlet near your router and wait for the Power LED to illuminate solidly.
Note: For safety, only plug the extender in the upright direction as shown below.
2. Press the WPS button on your host router that supports the OneMesh function for 1 second within 2 minutes, and then press the WPS button on the extender for 1 second within 2 minutes.

3. Wait until the signal LED switches from flashing to steady on, indicating a successful WPS connection.
Note: If the LED does not become solid on, repeat the process or go to How to Configure OneMesh Range Extender through Tether App or How to Configure OneMesh Range Extender via Web Browser.
4. After connecting to a OneMesh router, the extender will immediately duplicate the router’s wifi settings. Visit https://www.tp-link.com/onemesh/ for more information about OneMesh.
Note: To experience a smooth connection between dual-band networks, it is advised that you enable Smart Connect on your host router. Your host router’s 2.4GHz and 5GHz networks share the same SSID (network name) and password when Smart Connect is enabled. To activate Smart Connect, see the user handbook for your host router.
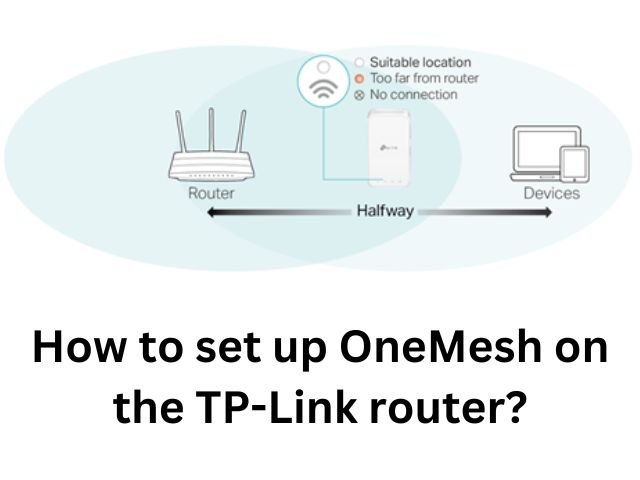
5. Reposition your extender to improve Wi-Fi coverage and performance.
a) Place the extension approximately halfway between your router and the Wi-Fi dead zone. Your chosen location must be within range of your router.
b) Wait around 2 minutes for the Signal LED to turn solid white. If it does not, move the extension closer to the router to improve signal quality.
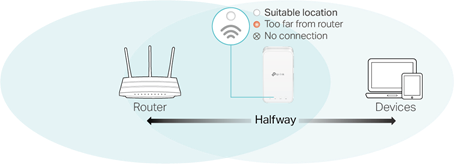
Note: To avoid signal interference, locate a place distant from Bluetooth devices and other households electrical equipment like cordless phones, microwave ovens, and baby monitors.
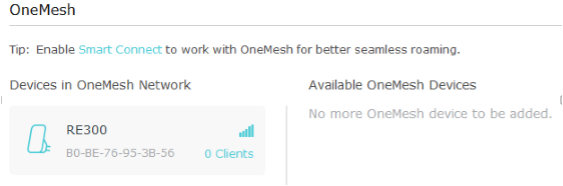
Test whether the OneMesh network is built successfully or not:
To join the OneMesh network, follow the steps outlined above. Following that, you can examine all the devices in your OneMesh network under Basic > OneMesh on your host router’s web control page.

How to Configure OneMesh Range Extender via the Tether app?
To configure the OneMesh range extender using the Tether app, follow the instructions below. RE300 is used as an example here.
- Connect the extender to an electrical outlet near your router and wait for the Power LED to turn solid on.
** Please keep in mind that the extender should only be plugged in upright.
- Search for TP-Link Tether in the Apple App Store or Google Play Store, or just scan the QR code to download and install the app.

- Go to Wi-Fi Settings and connect the extender’s wireless network: TP-Link Extender.
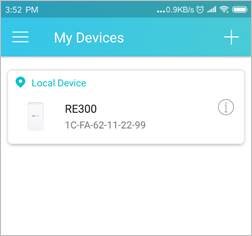
4. To log in, launch the Tether app, choose your extender from the Local Device list, and generate a password.
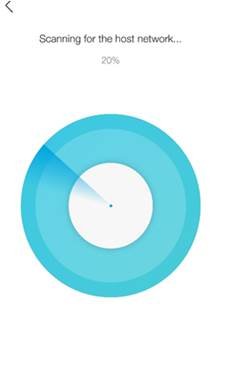
5. Follow the app’s instructions to connect your extender to your host router that supports the OneMesh function.
- Scan the Host network


6. Allow Join OneMesh to copy the wifi settings from your router for easy traveling. More information on OneMesh may be found at https://www.tp-link.com/onemesh/.
**Note: To experience a smooth connection between dual-band networks, it is advised that you enable Smart Connect on your host router. Your host router’s 2.4GHz and 5GHz networks share the same SSID (network name) and password when Smart Connect is enabled. To activate Smart Connect, see the user handbook for your host router.
7. To experience the expanded network, reposition your extender and follow the app’s instructions.
**Note: To use a more intuitive location helper, go to Tools > Location Assistant in the extension settings. The tether may also be used to manage your extender, such as adjusting LEDs, exchanging network passwords, and restricting devices.
Test whether the OneMesh network is built successfully or not:
To join the OneMesh network, follow the steps outlined above. Following that, you can examine all the devices in your OneMesh network under Basic > OneMesh on your host router’s web control page.
Many reasons to choose OneMesh
- Extend Wi-Fi connectivity to your home’s dead zones.
- Wi-Fi connections with a single name, eliminating the need to switch between router and range extender networks.
- Device setup and administration are simple and centralized.
- To simply update or configure wireless settings, manage your whole-home Wi-Fi through a central node (primary router) using the Tether app or Web UI.
- When compared to other mesh networks, this is a more affordable network option.
- Add to existing TP-Link OneMesh compatible devices.
OneMesh is an economical alternative for enjoying the ease of a mesh network with current devices.